En Français :-)
Stiff sourdough
90g plain flour
40g water
30-40g active liquid sourdough


Stiff sourdough
90g plain flour
40g water
30-40g active liquid sourdough
Final Dough (for 5 small 180g mini baguettes)
500g flour (plain will do)
375g water
150g stiff sourdough
12-13g salt
1-2g quick yeast (1/4 tsp)

Thanks again to the following website:
The following recipe is the outcome of several months of trying such or such recipe, of practicing various types of kneading, of shaping and pre-shaping again and again, of proving sometimes to briefly, often for too long, of hoping for something magical when finally opening the oven and finally going for a recipe and using techniques from the above website.
The result is extremely satisfying and the taste, according to friends and family, is better than your average boulangerie. Let's try it!
For an even better outcome:
(NB: Without wanting to discourage those who do not have such equipment: you CAN do this recipe with a well floured tray and the slashes can be made with a stanley blade or a good knife)
- An oven stone. The difference in cooking quality is huge. You will get a better oven spring because the heat is coming from under as well.

- If you are using a stone, you will have to transfer your baguettes from a well floured linen couche where they will have proved one last time, to a thin piece of flat wood, then on to a home size pizza shovel. See later on...
 |
Linen couche. Last proving.
|
- A lamette/grignette.

- A dough cutter and/or a plastic dough scraper

Recipe for sourdough baguettes (for 5 small 180g mini baguettes)
500g flour (plain will do)
375g water
150g stiff sourdough
12-13g salt
1-2g quick yeast (1/4 tsp)
- Mix your beautiful stiff sourdough to the water and yeast in a big bowl.
 |
You should get a bubbly mixture
|
- Add the flour and the salt. Mix well to a rough dough and leave it to rest for 30 min. (Autolyse).
 |
The dough has been mixed. It is very wet (about 70% humidity).
Leave it to rest for the Autolyse phase.
|
- Time for the Stretch and Fold phase (S&F). Because the dough is very wet, kneading the dough is quite sticky and requires some (very interesting) technique (here) (Breadcetera). One S&F consists in stretching the dough (with your hand or with a scraper) from underneath and folding it over to the top of the dough. Turn the bowl one fifth of a turn and procede again. Do this until you have done four complete rounds, so about 20 S&Fs:
- I do this four times, once every 20 minutes. This technique redistributes the gluten in the dough and brings it air and strength. Total time should be 1h20 after the autolyse is complete.
- After the last fold, leave it for another 20 min, then cover with cling film and put in the fridge overnight or more, depending on your planning. This is one of the keys to making good bread because the taste develops thanks to fermenting the dough for longer. The cold from the fridge prevents the dough from rising too much and helps fermenting for longer.
- Get your bowl out, put a little flour on your work area and gently scrape the dough out onto it. Degas the dough, just a few slaps with your hands down will do.
- Time to cut and weigh bits of about 200g of dough to make your mini baguettes.
 |
Some great tools: the dough scraper
and the dough cutter to cut and handle your dough. |

- Pre-shape your bits of dough to boules:
- Leave them to rest for an hour covered with a clean cloth, preferably linen because it tends to stick less to sticky doughs. I go right ahead and throw some flour on the boules before covering them. The dough will rest and rise a little after a very cold night. Some fermentation bubbles should start appearing.

- Shaping
- Pre-heat your oven at 240°C (464F). If you have a couche, a pizza shovel and your oven stone ready then prepare your couche. It must be well floured. Otherwise you can simply put your baguettes straight onto the tray you'll use for baking. That must be either oiled or floured. I have also used silicon sheets, which works very well.

- for the actual technique of shaping, check out this video ... (Thank you Bread cetera! Amazing blog!)
- Or that video... (for longer baguettes)
- Once shaped, your baguette can be transfered to the couche with the seal under. Don't hesitate to flour it again because it is still quite sticky and should not stick to the couche or the shovel later. Cover with the rest of the couche or a clean cloth. No couche? Put them straight onto your floured tray for example. Leave for a second proving of about 50 min to an hour, that depends on the temperature.
 |
Advantage of using a couche: the baguettes
keep their original shape whilst proving. |
 |
NB: Don't let them to prove for too long. Do the finger test:
touch the dough with your finger, if it springs back it can prove for longer.
If it reshapes very very slowly, you have proved them for too long.
The dough should take about 2 seconds to slowly reform.
If you have gone too far, it might not get a good oven spring...
|
- Transfer the baguettes from the couche to the pizza shovel with a thin piece of long wood. Remember to put some flour or even better, some semolina flour on the shovel to make sure the dough does not stick when you slide it into the oven.
 |
- Put a glass of cold water in a hot tray at the bottom of the oben to have a good humid environment in your 240 °C oven.
- Do three incisions with a lame if you have one, they are really really good and will cut through any kind of dough! Fairly deep incisions, about 1 cm at least.
Check out the following video on good scoring:
|
Get a lamette/grignette! you won't regret it...
|
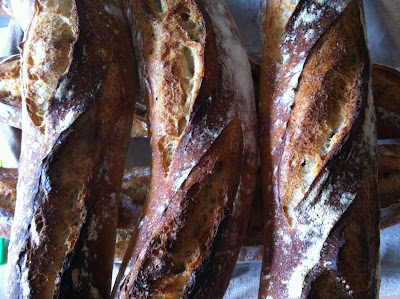
- Slide your baguettes onto the stone into the oven. Bake for 20-25 minutes at 240C and start praying... :-)


Your very welcome! They are also very good for pizza of course. Let me know how your breads turn out.
RépondreSupprimerGuillaume